Strawberry Cheesecake Ice Cream

This gallery contains 5 photos.

It is September … already! Halloween merchandise is popping up in stores … Christmas too! I know it happens every year at this time … but I’m still amazed how quickly time passes! Summer just can’t be over … I … Continue reading

Red Velvet Cupcakes … the sweet simple way

This gallery contains 2 photos.

Red Velvet Cupcakes with Cream Cheese Icing … a favorite for so many people. I love cream cheese icing … can you see the flecks of vanilla bean in the photo above?  I love, love, love it 🙂 Now, true … Continue reading

Lookie, Lookie … Do You Like This Cookie?

This gallery contains 3 photos.

Do you remember my Oatmeal Raisin Cookies from last week? It seems like we all have an opinion about the way we like our cookies. Some like chewy … some crispy … oh, don’t forget the nuts … maybe chocolate … Continue reading

Green Velvet Waffles

This gallery contains 14 photos.

OR THE DOUBLE RAINBOW VERSION FOR THE KIDS … Green waffle batter + a little cocoa + cream cheese topping = green velvet waffles!  Consider the warm maple syrup “the gold” at the end of this rainbow.  This breakfast is … Continue reading

Valentine’s Day Recap

This is just a reminder that tomorrow is Valentine’s Day!  Are you ready?  If not … don’t panic … I thought that I would do a little recap of a few quick Valentine’s Day ideas.

Treats for the young and old …

  Edible Cupcake Box

    Valentine Bug Cupcakes

  Conversation Marshmallow Pops

  Strawberry Heart Marshmallows

    Valentine Sno-Caps

  Red Velvet Bottom Cupcakes

A few ideas that can be made in a big batch, divided up and packaged for individual treats …

Chocolate Caramel Salty Peanut Bark

  Chocolate Peanut Popcorn

I would like to say “THANK YOU” to everyone who voted for me in the Celebrations Cupcake Crown contest!

Red Velvet Bottom Cupcakes

This gallery contains 11 photos.

Today, I am on my way to a surprise birthday celebration for my sister-in-law.  She should be in the car and on the road right now … so this is still a secret from her.  Red velvet is one of … Continue reading

Pumpkindoodle Cookies

It’s November and I just realized that I haven’t made anything with pumpkin! I have thought about pumpkin, a lot … cut recipes out of magazines … printed recipes from other blogs … gone thru old recipes … even bought two pie pumpkins … but I still had not baked anything pumpkin! So, I finally did it … and actually came up with a new creation. I hope you enjoy it.

Before I started to make these cookies, I had decided to call them Pumpkin Pie Cookies. Then as soon as I started rolling the dough into balls, then rolling them in sugar with spices … I realized how much they remind me of making Snickerdoodles … and they became Pumpkindoodles!

I will take this time to apologize for the photos … I started this project in the day … and continued at night … I bake better than I take pics … someday I’ll take better pics … someday I’ll get a “big girl” camera … maybe I should learn to use what I have.

First, make the cookie dough –

Have you tried vanilla bean paste?  I think that it adds something special … a richer deeper vanilla flavor … and little flecks of color …

Cream together the butter, vanilla and sugar … see how thick and rich the vanilla paste is … don’t worry if you don’t have the paste, vanilla extract also works well …

It will look like this …

Mix in the flour and salt …

   Cover and set aside …

Now, make the pumpkin filling …

Mix cream cheese, pumpkin, sugar and pumpkin pie spice …

Mix until well combined …

  Set it aside …

Mix up more sugar and pumpkin pie spice to roll the cookies in …

Start the assembly line … roll the cookie dough in balls, about the size of a walnut … then flatten slightly … and dip it in the sugar mixture …

Lay the cookie dough on a parchment lined cookie sheet …

Make a well in the center of the cookie … I used my knuckle … I guess they could be “knuckle print” cookies, not “thumb print” cookies … sorry, I couldn’t resist …

I put the filling in a plastic zip top bag … snipped the corner off … and squeezed the filling into the cookies …

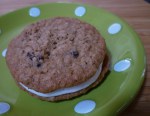
Bake the cookies … cool the cookies … consume the cookies … yum!

P.S.  The cookie dough may seem familiar … it is 1/2 recipe of my favorite Shortbread Cookies.

Pumpkindoodles

Cookies

  • 1 cup butter (2 sticks) softened
  • 1 cup powdered sugar
  • 1/4 teaspoon salt
  • 1 teaspoon vanilla (paste or extract)
  • 2-1/4 cups unbleached flour (or all-purpose)

Filling

  • 4 ounces (1/2 block) cream cheese softened
  • 1 cup canned pumpkin
  • 1-1/2 teaspoon pumpkin pie spice
  • 1/4 cup granulated sugar

Sugar Mixture

  • 1/4 cup granulated sugar
  • 1-1/2 teaspoon pumpkin pie spice

Make the cookie dough – Cream together the butter, vanilla and sugar.  Add the flour and salt.  Mix until blended.  The dough will be stiff.

Make the filling – Cream together the cream cheese, pumpkin, spice and sugar.

Make the sugar mixture – In a small bowl, mix the sugar and spice.

Roll the cookie dough in balls about the size of a walnut (1″ to 1-1/4″), flatten slightly.  Roll the dough in the sugar mixture and place on parchment paper lined baking sheet.  Make a well in the cookie dough and fill with pumpkin filling (spoon it or pipe it in the well).  Bake at 375°F for 11-13 minutes or until lightly golden on edges of the cookie.  Cool completely.  Makes about 36 cookies.  Store in a covered container, not airtight.

I love your comments, please leave one …

Only 3 days left until Halloween!

I can’t believe that October has come … and is almost gone!  All the other holidays will be here before we know it.  Time sure does fly when you are having fun!  I certainly have had fun sharing my ideas with you … and there are more to come 🙂

Here is a quick summary of Halloween …

   Frankenstein Marshmallow Pops

   Eyeball Marshmallow Pops

   Textured Halloween Bark

   Witch Hat Cupcakes

   The Witch is Dead … Cupcakes

   The Bride of Frankenstein Pops

   Tangerine Jack-o-lanterns

   Black bottom cupcakes with spider webs

And for fall … this is what I have made so far …

   Peanut butter & chocolate acorns

   Candy corn popcorn


Now I am off to the kitchen …


Halloween Black Bottom Cupcakes

Black bottom cupcakes have been around forever.  They truly are oldies but goodies.  The best of two worlds … cake and cheesecake all rolled into one … yum!

I usually don’t make colored filling for these cupcakes … but it is Halloween after all!  And the spider webs could be used on any cupcake or by themselves.

I will give you the recipe and directions for making the spider webs.  So let’s get started …

Make the filling.  Mix the cream cheese, sugar and egg until smooth …

Stir in the chocolate chips …

Stir in the orange food coloring (I use Americolor about 3 drops) …


Now make the chocolate cake.  Whisk together the dry ingredients … flour, sugar, cocoa, salt and baking soda …

Add the wet ingredients … water, oil, vinegar and vanilla … stir until smooth … 

Fill lined cupcake pans (1/3 full) …

Add the filling … (you could sprinkle some chopped nuts on top at this point) and bake …


While the cupcakes are baking, we can make the spider webs.  You will need …

  • Melted white chocolate or candy melts (about 8 ounces for 24 webs) in a squeeze bottle or pastry bag
  • Chocolate chips (24)
  • Black edible marker
  • Wax paper
  • A toothpick

I have a tendency to lose control over the size of things … so I drew 2-1/2″ circles on a sheet of paper as a guideline for the size of my spider webs …

I placed the paper on a cookie sheet and covered it with wax paper …

On top of the wax paper, make a small puddle (about the size of your thumbnail) of melted white chocolate and work the spiral out …

Using the toothpick, drag the white chocolate from the center to the outside rim …

Add a chocolate chip (spider body) to the center of the web …

Pop the webs into the fridge for a few minutes to firm up.   Then use the marker to give the spider some legs and lay the webs on to of the cooled cupcakes …

Black Bottom Cupcakes

  • 8 ounces cream cheese (light or regular) softened
  • 1 egg
  • 1-1/3 cups sugar
  • 1 cup semi-sweet chocolate chips
  • 1-1/2 cups flour
  • 1/4 cup cocoa powder
  • 1 teaspoon baking soda
  • 1 teaspoon salt
  • 1 cup water
  • 1/3 cup canola oil
  • 1 tablespoon white vinegar
  • 1 teaspoon vanilla
  • Chopped nuts (optional)

1.  In a small bowl, mix cream cheese, egg and 1/3 cup sugar until smooth.  Stir in chocolate chips.  Set aside.

2.  In a medium bowl combine flour, cocoa, baking soda, salt and 1 cup sugar.  Stir in water, oil, vinegar and vanilla.  Beat until smooth.

3.  Fill lined cupcake pans 1/3 full with chocolate mixture.  Spoon cheese mixture on top.  Sprinkle with nuts if desired.

4.  Bake at 350°F 30-35 minutes.  Do not overbake.   Makes 24 cupcakes.

I do recommend serving these cupcake after they are completely cooled.  I like to refrigerate them … but I like cold cheesecake.

I love comments …

Mystery Spice Cake … completed!

Today, as promised, I frosted the Mystery Spice Cake.  I used Cream Cheese Icing and added about one extra cup of powdered sugar to stiffen up the icing.   Usually I don’t use Cream Cheese Icing for decorating because it softens so easily.

Let me take this time to confess that I am not a professional cake decorator, as you will soon see.  What I visualize in my mind does not always translate to the cake.  I just keep practicing!

I baked and froze my cake yesterday because I believe that freezing helps the cake to retain its moisture.  Plus, I find it easier to handle and frost a frozen cake.  As you can see, the cake is standing on its side and I am balancing it with one finger … and it is not falling apart!

Put a dollop of icing on the plate to help prevent the cake from slipping around …

Apply a thin coat of icing … some call this a “crumb coat” because it seals in the crumbs … some call it “dirty icing” …

Don’t worry if it’s not pretty …

Cake #1

I like fast and easy decorating … and texture can add interest.  I used tip #17 and created swirls, starting in the center working my way out …

I would use this type of decoration for many occasions …

Cake #2

Since it is fall … I colored the icing orange … used tip #199 and made what I hope would look like pumpkins …

I use broken pretzel sticks as stems …

Using green icing make vines with tip #2 …

The weather warmed up this afternoon and the pumpkins show it!  Make leaves with tip #352 … remember to hold the tip so that it looks like a bird’s beak …

I made a little red icing to try to make an apple … I’m not sure about it …

Enjoy …

With the addition of sooo much cream cheese icing, I believe this cake could serve 10 people.

I ♥ comments!!!