Lamb Marshmallow Pops

This gallery contains 10 photos.

Lambs are so fluffy on the outside … but these lambs are fluffy marshmallows on the inside.  Yes, I am still obsessed with jumbo marshmallows and that’s why I made Lamb Marshmallow Pops! It is hard to tell from the … Continue reading

Candy Flower Pops

A few weeks ago a friend gave me a little bag of pastel candy corn because she thought that I could use it.  I have seen this candy every year around Easter and never thought to do anything with it, except eat it.  Well, I considered this a challenge … what could I do? … I thought about bunny ears … but that has been done.  Flowers popped into my head … really simple candy flowers!  This was a perfect plan … my friend that gave me the candy is named Dinaz … her favorite flower is a daisy … so these candy flowers are “Daisies for Dinaz”.

This project is more of a craft project … no baking or cooking required!  This is what you will need … lollipop sticks, chocolate/candy melts, pastel candy corn (sometimes called bunny corn) …

Lay one candy disc flat side up and start “gluing” (using melted chocolate/candy melts) the lollipop stick and candy petals (4,5 or 6) in place … be patient, the petals can slip around a little …


Add a little more “candy glue” and place another candy disc on top … let the candy dry and your first flower is complete … How easy was that?

I love the colors … they remind me of something from the 60’s or 70’s!

Duck Marshmallow Pop

This gallery contains 12 photos.

Rubber ducks are sooo cute … but so are marshmallow ducks.  I wanted to call this little guy (my duck is a boy, I don’t know why) a rubber ducky, but would that imply that I used old rubbery marshmallows?  Of course I didn’t!  This … Continue reading

Marshmallow Easter Bunnies

Sweet sugared bunnies … inspired by Peeps.  These are sooo easy to make and would be too cute in an Easter Basket along with the Mallow Yellow Chicks (from last week).

This is what you will need … large marshmallows, pink candy melts, pink sanding sugar, just a little bit of dark chocolate for eyes,  jordan almonds (I only used white ones), and lollipop sticks …

Melt the candy (see directions under melting chocolate).  Put 2 marshmallows on a lollipop stick as shown …

Using a knife or scissors, make a slit on the top marshmallow to add the ears … then dip the tips of the jordan almonds in melted pink candy and insert into the slit … and let candy dry …


Cover the entire bunny in melted candy (dip it or use a spoon) and tap off excess … then sprinkle sugar all over the bunny …


Let the bunny dry … then add eyes and nose with melted dark chocolate …


Oh no, they have multiplied like rabbits!

Cake Pops? … No, April Fools! … COOKIE POPS – Peanut Butter & Chocolate!!!

Cake pops are a wonderful thing, but have you ever tried cookie pops?  These cookie pops are so simple … no baking required!  Yesterday I wanted to make something that didn’t requiring turning the oven on … it was over 90° here in southern California.  I decided to make cookie pops.  I had made similar ones in the past using cream cheese, but did not feel comfortable about leaving them out of the fridge … did I mention that it was over 90°? 

These cookie pops are made from cookies, therefore they are not as moist as a cake pop.  My husband, the peanut butter addict, thought that they were wonderful. 

You will need …

  Lollipop sticks, sprinkles (optional) and chocolate for dipping!

Crush, crumble or smash the Nutter Butters … use a resealable plastic bag and rolling-pin or a food processor (I need to buy a new one) … you want crumbles not powder … pour them in a large mixing bowl …


Mix in the whole can of icing …


Prep a cookie sheet with waxed paper or parchment and melt about 1/2 cup of the chocolate.  Roll the mixture into balls (3/4″ – 1″) … the mixture will be appear dry, but does firm up while you are working with it.  Use a lollipop stick to “drill” a hole about half way into the ball … then dip the stick into the melted chocolate and insert it into the ball … lay on cookie sheet.   


Put the tray of cookie pops in the fridge for 1 hour or until totally chilled.  Prep a sucker stand (styrofoam) and chocolate for dipping … remove about 10 – 12 pops from fridge … start dipping making sure that you cover the entire ball all the way to the stick … tap off excess chocolate … add sprinkles (optional) and place in stand to dry!


NUTTER BUTTER COOKIE POPS

1 package of Nutter Butter cookies

1 16 oz. can vanilla frosting

1 pound of chocolate

Lollipop sticks

Sprinkles (optional)

Crumble cookies in resealable plastic bag (gallon size) and rolling-pin or use a food processor.  Pour cookie crumbled cookies into a large mixing bowl.   Add frosting and mix well.   Prep cookie sheet with waxed paper or parchment and melt 1/2 cup of chocolate.  Roll the cookie mixture into balls (3/4″ – 1″).  Use a lollipop stick to “drill” a hole about half way into the ball, then dip the stick into melted chocolate and insert into the hole.  Lay pop on cookie sheet and repeat until all mixture is used.  Place tray of pops in the refrigerator for 1 hour or until chilled.  Melt remainder of chocolate.  Remove 10 – 12 pops from the fridge and dip into melted chocolate, making sure that the entire pop is covered in chocolate.  Tap off excess chocolate, add sprinkles if desired and place pop in a lollipop stand or styrofoam to dry.     Makes 35 – 40 pops

Yellow Chick Marshmallow Pops

This gallery contains 10 photos.

Spring has sprung … finally!  The sun is shining, flowers are blooming and the yard needs weeding.   The weeds will have to wait … I have marshmallows that need to be dipped!  Yellow Chick Marshmallow Pops are more important than … Continue reading

More Pinwheels…Peanut Butter, Cream Cheese and Chocolate Chip

I would like to share a secret with you … there is something that you should know about my husband, The Peanut Butter Addict … he would be very happy if he could have a treat everyday made with peanut butter.  This really isn’t a secret, it’s a well know fact among family and friends.  So, after I posted yesterday’s Jam-Packed Pie Crust Pinwheels, I went to work making different Pinwheels … peanut butter & chocolate chips … cream cheese & chocolate chips.  Needless to say, The Peanut Butter Addict was a happy camper.  After all, he “had” to eat them for “research purposes”.  I conducted a very unscientific pinwheel survey.  Here are my family’s favorites … The Peanut Butter Addict – peanut butter & chocolate chips (big surprise)… Son #3 – jam & nuts … Sone #2 – doesn’t like pie crust and won’t try any … me – all of them, I love pie crust. 

Recipes like these Pinwheels are “guidelines” and can be altered to fit your tastes.  If you come up with different ideas or suggestions, please share in the comments section below.

This time you will need … refrigerated rolled pie crusts, granulated sugar, powdered sugar, cream cheese (regular or lite), peanut butter and mini chocolate chips.

  (oops … forgot the sugars in the photo)

First, mix the filling (peanut butter or cream cheese) with powdered sugar …

Next, sprinkle granulated sugar on parchment and place pie crust on sugar.  Press on crust to make sure sugar adheres to it …


Now, spread the filling all over the crust and sprinkle with chocolate chips …


Roll it up tight … cut off the ends … cut the log in 1″ pieces …


Place the pieces on a parchment lined baking sheet and bake!

Peanut Butter, Cream Cheese and Chocolate Chip Pinwheels (adapted from Womans Day)

For each flavor Pinwheel you will need …

1 tablespoon granulated sugar

1 refrigerated rolled pie crust (at room temperature)

1/4 cup peanut butter or cream cheese (softened)

2 tablespoons powered sugar

1/4 cup mini chocolate chips

1.  Heat oven to 400°.  Line a baking sheet with parchment paper.

2.  Mix peanut butter or cream cheese with powdered sugar to create the filling.

3.  Sprinkle a parchment covered work surface with granulated sugar.  Unroll pie curst, place it on the sugar and press gently to help the sugar adhere to the crust.

4.  Spread the filling evenly over the crust and sprinkle the chocolate chips over the top.  Starting at one end, tightly roll the dough into a log. 

5.  Trim the ends of each log, then cut in to 1″ thick slices and stand them on cut edge on the prepared baking sheet.  Bake until golden brown, 20-25 minutes.  Let cool completely.

St. Patrick’s Day Marshmallow Cupcakes

St. Patrick’s Day is Thursday, March 17.  Here is an easy NO BAKE CUPCAKE that you can whip up very quickly.  First of all, have you seen these gigantic marshmallows?  I found them at Target and have become obsessed with them.  I have so many ideas for these wonderful marshmallows.  These are made by Kraft, but I’ve seen other brands.  There are even some that are flavored. This idea can be adapted to fit any occasion.  Make it even easier by using pre-made decorations.

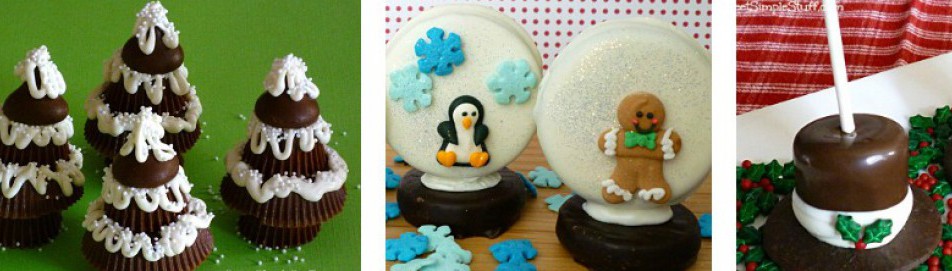
This is what you will need to make the cupcakes and shamrocks…   Jumbo marshmallows, melted chocolate (see how to melt at top of page), cupcake papers, frosting (oops…forgot the photos), nonpareils or colored sanding sugar.  I am showing 3  sizes(miniature, large and jumbo) of marshmallows so that you can compare them.


Put the nonpareils or sugar in a shallow bowl/plate and pour the melted chocolate in a squeeze bottle.  Pipe the shamrocks right on the nonpareils (3 hearts and a stem).  Pop them in the freezer for few minutes.  You have made chocolate shamrocks!


Let’s make the “no-bake cupcakes”…

Melt the chocolate in a deep container.  Insert a sucker stick  (skewer or fork or whatever you have on hand) into the flat side of the marshmallow.  Submerge the marshmallow into the melted chocolate…

Tap off excess chocolate and place the marshmallow in a cupcake paper.  Use a spoon to help get the marshmallow off the stick and make sure that all of the marshmallow is covered by chocolate.  Pop them in the freezer for about 5 minutes or 15 minutes in the fridge.

It is time to add the frosting!  I have included a few icing recipes or use ready made.  Put your decorating tip (I used #1M or #2110) in your pastry bag and fill with frosting.  If you don’t have a bag or tip, use a Ziploc bag and snip a corner (about 1/4″) off.  Pipe a swirl on top (start on the outer edge and work toward the center).

Now decorate with sprinkles, shamrocks or both…

Happy St. Patrick’s Day!!!

Here are some icing recipes that I use most frequently on cupcakes and cakes…

Super Easy Buttercream

In a mixing bowl combine 1 pound powdered sugar, 1/4 teaspoon salt, 1/4 cup milk, 1 teaspoon vanilla, 5 tablespoon softened butter.  Beat until smooth (remember to scrape the bowl).

My Favorite Decorator Icing

1 cup butter*

1 pound powdered sugar

1/4 teaspoon salt

1 1/2 teaspoons meringue powder (optional, but helps give a light crust)

1 teaspoon vanilla

1/2 teaspoon almond extract

2-3 ounces heavy cream

In a large mixer bowl with paddle attachment, cream butter, sugar, meringue powder and 1/2 of the cream.  Add salt, flavorings and enough cream to make the consistency you desire.  Beat at medium speed until icing is fluffy.

*You may substitute vegetable shortening (Crisco) for part or all of the butter, but it will result in a different texture and taste.

Cream Cheese Icing  (softer consistency)

In a mixing bowl, combine 8 ounces (1 block) cream cheese*, 4 tablespoons (1/2 stick) butter, 1 teaspoon vanilla and 1 pound powdered sugar.  Beat until creamy.

* You may substitute neufchâtel (light) cream cheese.

Cupcake Shortbread Cookies

This gallery contains 21 photos.

Cupcakes that are cookies … or cookies that are cupcakes… what could be better?  I made these cookies for my friend Jan.  It was her birthday and I brought these cookies as party favors for the “girls’ night out”.  Jan … Continue reading