Peppermint, Chocolate and Marshmallows …

This gallery contains 8 photos.

 Peppermint S’mores and Peppermint Marshmallow Pops Are you done with all your holiday baking?  I’m not … I am still baking, melting, mixing, etc. This is a quick and easy treat.  I am going to pack up about six pops … Continue reading

Snowman Marshmallow Pops

This gallery contains 1 photo.

Snowmen are so easy to make … these marshmallows were dipped in white chocolate … but you could skip it … marshmallows are white! Let me tell you what I used for each decoration … noses are made of royal … Continue reading

Turkey Leg Cake Pops

This gallery contains 7 photos.

Are these an entrée, appetizer or dessert?  Yes, they are cake pops!  A simple and fun little treat to make for Thanksgiving or anytime. This is what you will need … 2 pounds of milk chocolate candy melts 16 oz. … Continue reading

Marshmallow Pilgrim Hats

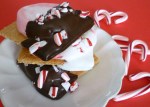
The weeks are flying by … can you believe it’s mid November?  These little goodies are quick, easy and can be made now and kept until Thanksgiving.  The kids could help  … they’ll love making the Marshmallow Pilgrim Hats … eating the pops too!

0081 marshmallow pilgrim hats

This is what you will need …

  • Large marshmallows (I used the caramel/vanilla swirl, just because)
  • Famous Chocolate Wafers (or something similar)
  • Lollipop sticks
  • Melted dark chocolate (about 1 pound for 24 marshmallows)
  • Melted chocolate of a contrasting color (I just used up some leftovers)
  • Marker with edible ink (oops, forgot it in the photo)

Dip the tip of the lollipop stick in melted dark chocolate … then poke it in the marshmallow … set it aside to firm up.  This will help prevent the marshmallow from slipping around on the stick and create a clean line of chocolate on the stick …

Dip the marshmallow in the chocolate … tap off excess chocolate and place in styrofoam or similar holder.  Then pop them in the fridge or freeze for a few minutes to firm up …

Lay out some chocolate cookie wafers on a cookie sheet (break off any uneven pieces) … dip 1/4 to 1/3 of the chocolate marshmallow in a contrasting color … then place it on top of a cookie …

Use the marker (edible of course) to draw a buckle …

I told you that this project was fast and easy!

Are you wondering who the winner of the giveaway is?

     The winner is #12, Janice!  I will be sending an email.

Thank you to everyone for participating … I hope it was helpful to you … it was to me.

  • I had forgotten about Cost Plus World Market … thanks Carolyn.

  • I never would have thought of Avon … thanks Sandy.

  • Have you ever checked Cracker Barrel’s candy section?  They carry all sorts of stuff.

I ♥ comments …

Advertisement

Chocolate Dipped Nutter Butter Marshmallow Pops

Nutter Butter cookies, marshmallows, chocolate, sprinkles and chopped peanuts … some of my hubby’s (The Peanut Butter Addict) favorite foods.  I think his eyes were twinkling when he saw these treats.

What should they be called?  I couldn’t come up with a name … just a description.  Oh, I did decide they are pops because the Nutter Butter cookie is the stick … an edible stick … or should it be called a handle?

The whole creation came about because I have come across so many recipes for cookies and brownies stuffed with Nutter Butters or Oreos.  I decided to stuff Nutter Butters in marshmallows … easier said than done.  I broke several Nutter Butters trying to stuff marshmallows … and finally decided a different approach was necessary.  I know that this is not a great culinary creation … just a fun little no-bake treat!

This is what you will need … about 1 pound of chocolate or candy melts, one    10 oz. bag of large marshmallows, 1 package of Nutter Butter cookies, chopped peanuts and sprinkles …

Set up an assembly line … cover a baking sheet with waxed paper or parchment, cut the marshmallows in half (scissors work well), melt the chocolate … put some melted chocolate on the cut side of the marshmallow … the chocolate will act like glue …

Attach one half of the marshmallow to the Nutter Butter and then attach the other half to the other side of the cookie …

Let the chocolate harden up …

Dip the marshmallow in melted chocolate … covering the entire marshmallow … tap off the excess chocolate …

Dip in sprinkles, chopped nuts or ? … and set on waxed paper … pop them in the fridge or freezer for a few minutes to harden the chocolate …


Happy Grad Marshmallow Pops

Are all graduates happy?  I think so, especially if you give them marshmallows covered in chocolate!  Plus … school’s out for summer! 

These Happy Grad Pops would make nice little additions to any party table or individually packed as favors.  They can be made several weeks ahead of time and kept in a cool (not the refrigerator) dry place.

You will need … Jumbo marshmallows, Stackermallows (new from Kraft at Wal-Mart), AirHeads Xtremes, mini M&Ms, yellow candy melts, dark chocolate candy melts and lollipop sticks (I used 6″) …


Melt the yellow chocolate (see how to melt chocolate).  Cut the Jumbo Marshmallows in half (I used kitchen shears) so that you have 2 ovals/rounds … 


Insert the lollipop stick all the way thru the marshmallow half until it sticks out about 1/4″ on the end … keep in mind that this is the face and part of the grad cap (a long oval is better than a wide oval) …

Dip it in melted yellow chocolate … tap off excess chocolate … place StackerMallow on top, making sure that the stick is in the rectangular marshmallow … the melted chocolate will help “glue” the rectangular marshmallow …


Pop them in the refrigerator or freezer for a few minutes … melt the dark chocolate … while the lollipop is still cool … dip the rectangular marshmallow and a small portion of the oval (yellow) in the dark chocolate, forming the “cap” …


Let dry … I did fix that little spot on the cap with melted chocolate, oops! …

Put some of your melted dark chocolate in a squeeze bottle, disposable pastry bag or use a toothpick … use whatever works for you … draw a happy face … remember, squeeze lightly for a fine line … or squeeze harder for a thick line …

To make the tassel … using melted chocolate, attach an M&M (M down) … use a paring knife to slice the AirHeads in strips about 1-1/2″ long … attach with melted chocolate …

Congratulations … you have created Happy Grads!!!

Note :   You can use any color of chocolate … not just yellow … I must be stuck in the 70’s.

Graduation Cupcakes with Marshmallow Grad Cap Pops

It’s mid May and I just can’t believe that time is passing so quickly … it just dawned on me that school has already ended for some … and will be ending very shortly for others.  So, I hope this idea for graduation may be helpful to you. 

The graduation caps may be made in advance and stored in an airtight container for several weeks.  This is what you will need … large marshmallows, ” Stacker” marshmallows (new from Kraft – at Wall Mart), dark chocolate candy melts, 4-1/2″ lollipop sticks, Extreme AirHead Belts and mini M&M’s …

First of all, remember that marshmallows are not perfect … the new StackerMallows are rectangular (not square as I was hoping for) … round ones are sometimes are oblong … but remember – they are marshmallows … have fun with them! 

I made the caps two different ways …  For each cap you will need 1 rectangular and 1/2 of a large marshmallow.  Cut a large marshmallow in half (check out the photo) and place it on the rectangular marshmallow with a dot of melted chocolate between …


Dip the tip of the stick in melted chocolate … insert into the marshmallows (go thru both marshmallows) … and let it dry.  Now dip the entire marshmallow cap in melted chocolate … tap off excess chocolate …

Place the pop in holder or styrofoam and put in fridge or freezer for a few minutes to firm up.  If you get chocolate drips on the stick you can use a paring knife (smooth blade) to clean it up …

Attach a mini M&M (M down) with a dot of melted chocolate … Using a paring knife slice the AirHeads into strips … cut the lengths to about  1-1/2″ long … attach to cap with melted chocolate … you may have to hold it for a moment to prevent slipping …


Let’s move on to cupcakes … bake your favorite cupcakes … let them cool … make decorator icing (recipe found in the icing section above) … fill your decorator bag (I used Wilton tip #1M) with icing … working in a spiral pattern (start on the outside rim), frost cupcake … add sprinkles … insert marshmallow cap pop … 


Congratulations to all graduates!!!

COME BACK TOMORROW (May 18) FOR A NEW “HAPPY GRAD POP” !

Cupcake Tuesday at HoosierHomemade.com

Lamb Marshmallow Pops

This gallery contains 10 photos.

Lambs are so fluffy on the outside … but these lambs are fluffy marshmallows on the inside.  Yes, I am still obsessed with jumbo marshmallows and that’s why I made Lamb Marshmallow Pops! It is hard to tell from the … Continue reading

Candy Flower Pops

A few weeks ago a friend gave me a little bag of pastel candy corn because she thought that I could use it.  I have seen this candy every year around Easter and never thought to do anything with it, except eat it.  Well, I considered this a challenge … what could I do? … I thought about bunny ears … but that has been done.  Flowers popped into my head … really simple candy flowers!  This was a perfect plan … my friend that gave me the candy is named Dinaz … her favorite flower is a daisy … so these candy flowers are “Daisies for Dinaz”.

This project is more of a craft project … no baking or cooking required!  This is what you will need … lollipop sticks, chocolate/candy melts, pastel candy corn (sometimes called bunny corn) …

Lay one candy disc flat side up and start “gluing” (using melted chocolate/candy melts) the lollipop stick and candy petals (4,5 or 6) in place … be patient, the petals can slip around a little …


Add a little more “candy glue” and place another candy disc on top … let the candy dry and your first flower is complete … How easy was that?

I love the colors … they remind me of something from the 60’s or 70’s!

Duck Marshmallow Pop

This gallery contains 12 photos.

Rubber ducks are sooo cute … but so are marshmallow ducks.  I wanted to call this little guy (my duck is a boy, I don’t know why) a rubber ducky, but would that imply that I used old rubbery marshmallows?  Of course I didn’t!  This … Continue reading